
Photo Vibrance transforms static images into dynamic visuals effortlessly. It offers intuitive tools for creating eye-catching animations.
Photo Vibrance is gaining popularity among digital content creators. This software turns ordinary photos into engaging animated visuals quickly. Its user-friendly interface makes it accessible for beginners and experts alike. With its diverse range of features, Photo Vibrance allows users to add motion effects, 3D parallax animations, and dynamic elements to their images.
The software supports various formats, making it versatile for different platforms. It also provides export options for high-quality outputs. By enhancing photos with animations, users can capture more attention online. Photo Vibrance is a powerful tool for anyone looking to elevate their visual content.

Credit: m.youtube.com
Introduction To Photo Vibrance
Welcome to our Photo Vibrance review. Photo Vibrance is a tool that brings static photos to life. This software is perfect for creators and marketers. It transforms ordinary images into captivating visuals. Dive in to learn more.
What Is Photo Vibrance?
Photo Vibrance is an innovative photo animation tool. It allows users to animate static images. The results are eye-catching and engaging visuals. It’s simple to use and doesn’t require any technical skills.
Key Features
Photo Vibrance offers several powerful features. Let’s explore some of them:
| Feature | Description |
|---|---|
| 3D Parallax Effect | This feature adds depth to images. It creates a 3D effect by shifting layers. |
| Motion Animation | Animate specific parts of your photo. This brings static elements to life. |
| Particle Effects | Add dynamic particles like rain or snow. Enhance the mood of your image. |
| Easy Export | Export your creations in various formats. Share them on social media effortlessly. |
Besides these features, Photo Vibrance also offers:
- Custom Overlays for unique effects
- Simple User Interface for ease of use
- High-Quality Outputs ensuring professional results
These features make Photo Vibrance a powerful tool. It’s ideal for marketers, designers, and social media enthusiasts. Start creating stunning visuals today.
Getting Started
Welcome to our review of Photo Vibrance! In this section, we’ll guide you through the initial steps to get started with this dynamic photo animation software. We’ll cover the installation process and provide a user interface overview to help you begin your creative journey.
Installation Process
The installation process for Photo Vibrance is straightforward. Follow these steps to get started:
- Visit the official Photo Vibrance website.
- Download the installer for your operating system (Windows or Mac).
- Run the installer and follow the on-screen instructions.
- Once the installation is complete, launch Photo Vibrance.
You are now ready to explore and create amazing photo animations!
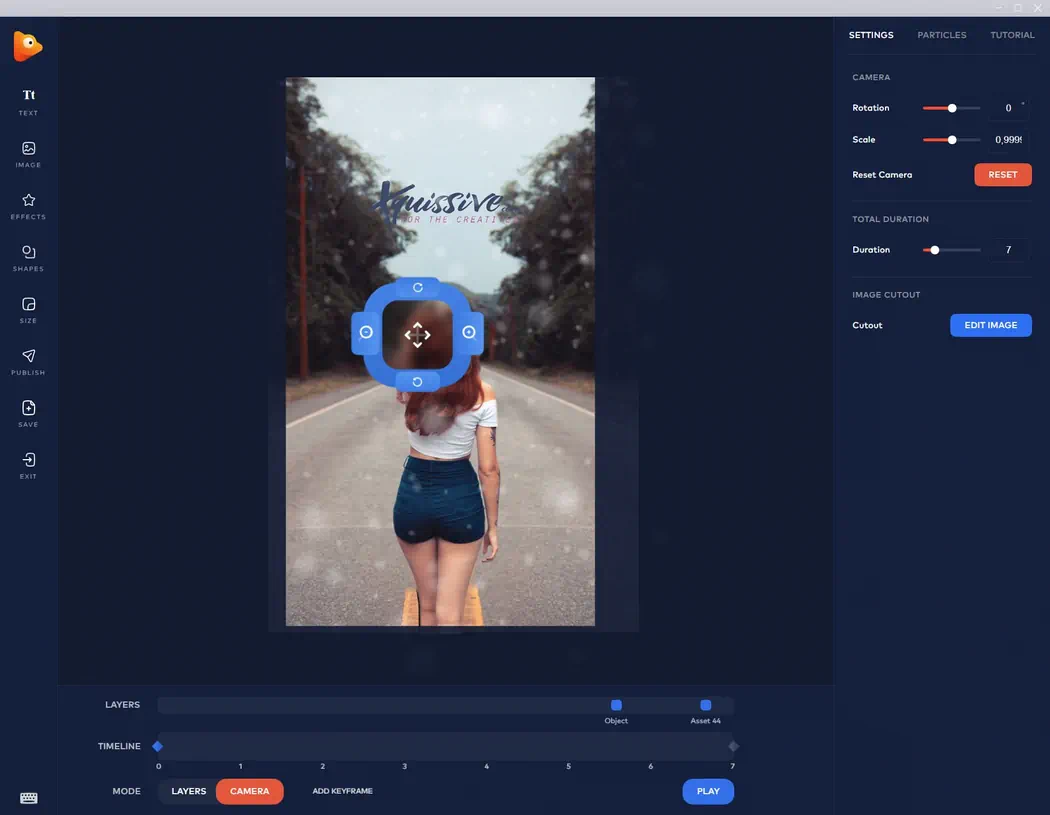
User Interface Overview
The user interface of Photo Vibrance is intuitive and user-friendly. Here’s a quick overview of the main components:
| Component | Description |
|---|---|
| Menu Bar | Access file options, settings, and help resources. |
| Tool Panel | Contains tools for animation, editing, and effects. |
| Canvas | The main area where you create and edit animations. |
| Layers Panel | Manage different layers of your project. |
| Timeline | Control the timing and sequence of your animations. |
With these components, you can easily navigate and use Photo Vibrance to bring your photos to life.
Creating Animated Images
Creating animated images has never been easier with Photo Vibrance. This powerful tool allows you to transform static images into dynamic, eye-catching visuals. You’ll be amazed at how simple and fun it is to add life to your photos.
Step-by-step Guide
- Upload Your Image: Start by uploading your chosen image into Photo Vibrance.
- Select Animation Points: Click on the areas you want to animate.
- Adjust Animation Settings: Fine-tune the speed and direction.
- Add Overlays: Choose from various overlays to enhance your image.
- Preview and Save: Preview your animation, then save it.
Tips For Best Results
- Use High-Quality Images: Higher resolution images yield better animations.
- Focus on Key Elements: Animate the most important parts of the image.
- Keep It Simple: Avoid overloading your image with too many animations.
- Experiment with Overlays: Try different overlays to see what works best.
- Preview Frequently: Regularly preview your work to make adjustments.
Credit: www.garagegymreviews.com
Advanced Features
Photo Vibrance offers advanced features that make photo editing fun. These tools create stunning and unique visuals. Let’s explore some of these features.
3d Parallax Effects
The 3D Parallax Effects add depth to your photos. This feature makes your images stand out. It brings a 3D look to flat pictures. Imagine your photos moving like a scene in a movie. This effect is perfect for social media posts. Your followers will love the dynamic look.
Using this feature is easy. First, upload your photo. Then, select the 3D Parallax tool. Next, adjust the settings to your liking. Finally, save your work and share it. This feature helps you create eye-catching content.
Custom Overlays
Custom Overlays allow you to add unique elements to your photos. These overlays can be anything you want. They can be shapes, texts, or even other images. This feature gives you full control over your creativity.
Here’s how to use it:
- Upload your photo.
- Select the Custom Overlay tool.
- Choose or create your overlay.
- Adjust the size and position.
- Save and share your edited photo.
Custom Overlays make your photos more engaging. They help you tell a story with your images. This feature is great for adding personal touches. Your photos will look professional and unique.
| Feature | Description |
|---|---|
| 3D Parallax Effects | Adds depth and motion to photos |
| Custom Overlays | Adds unique elements to photos |
Pros And Cons
Photo Vibrance is a popular tool for creating animated photos. Before purchasing, you should know its pros and cons. Below, we explore the advantages and limitations of Photo Vibrance.
Advantages
- Easy to Use: The interface is user-friendly and intuitive.
- High-Quality Animations: Create stunning animations with ease.
- Wide Range of Features: Offers many tools for customization.
- Affordable: The price is budget-friendly for most users.
- Regular Updates: The software gets frequent updates for improvements.
Limitations
- Learning Curve: Some features may take time to master.
- System Requirements: Needs a good computer for smooth performance.
- Limited Export Options: Fewer formats for exporting animations.
- No Mobile App: Only available for desktop users.
- Watermark in Free Version: The free version adds a watermark.
Credit: www.xquissive.com
Frequently Asked Questions
What Is Photo Vibrance?
Photo Vibrance is a software tool for creating animated photos and 3D motion images.
How Does Photo Vibrance Work?
It uses keyframe animation to add motion effects and bring still images to life.
Is Photo Vibrance Easy To Use?
Yes, it’s user-friendly with a simple interface, suitable for beginners and professionals alike.
Can Photo Vibrance Enhance Social Media Posts?
Absolutely, animated photos created with Photo Vibrance can boost engagement on social media platforms.
Does Photo Vibrance Support Multiple File Formats?
Yes, it supports various file formats, including JPG, PNG, and GIF for exporting animations.
Conclusion
Photo Vibrance offers a powerful tool for creating eye-catching animated images. Its user-friendly interface makes it accessible for everyone. Whether you’re a professional or a hobbyist, this software can enhance your visuals. Try Photo Vibrance to elevate your content and captivate your audience.
It’s a game-changer for any digital creator.

